Flume
Introduction
Apache Flume is a distributed, reliable, and available system for efficiently collecting, aggregating and moving large amounts of log data from many different sources to a centralized data store.
Architecture
A Flume event is defined as a unit of data flow having a byte payload and an optional set of string attributes. A Flume agent is a (JVM) process that hosts the components through which events flow from an external source to the next destination (hop).
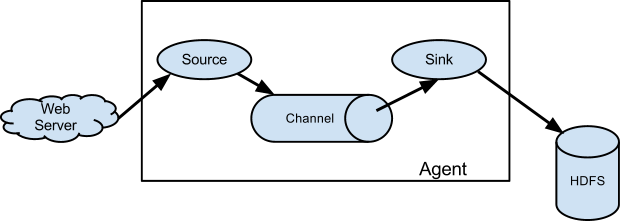
A Flume source consumes events delivered to it by an external source like a web server.
The external source sends events to Flume in a format that is recognized by the target Flume source.
For example, an Avro Flume source can be used to receive Avro events from Avro clients or other Flume
agents in the flow that send events from an Avro sink.
The channel is a passive store that keeps the event until its consumed by a Flume sink.
The file channel is one example – it is backed by the local filesystem.
The sink removes the event from the channel and puts it into an external repository like
HDFS (via Flume HDFS sink) or forwards it to the Flume source of the next Flume agent (next hop) in the flow.
The source and sink within the given agent run asynchronously with the events staged in the channel.
There are few rules to be remembered while designing flume data flow
1. There can be multiple channel per agent.
2. There can not be more then 1 source per agent. ( Here we are taking about per agent not for whole data flow)
3. There can not be more then 1 Sink per agent.
4. Source in an agent can receive data simultaneously from multiple external source.
There can be multiple agents.Flume allows a user to build multi-hop flows where events travel through
multiple agents before reaching the final destination.
DataFlow
Flume support these dataflow -
1. Multi Agent Data Flow (as shown above) - sink of the previous agent and source of the current hop need to be avro type with the sink pointing to the hostname (or IP address) and port of the source.
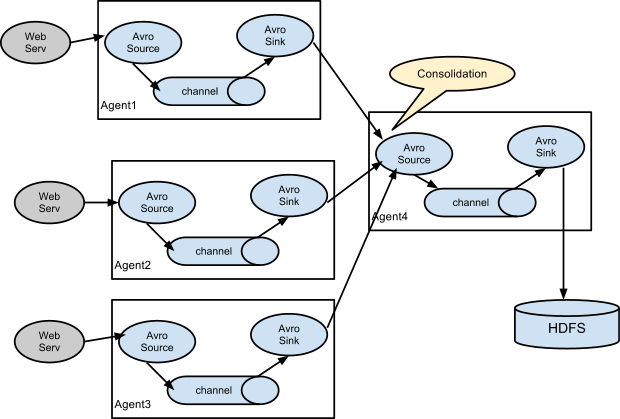
2. Consolidation (as shown above) - This can be achieved in Flume by configuring a number of first tier agents with an avro sink, all pointing to an avro source of single agent . This source on the second tier agent consolidates the received events into a single channel which is consumed by a sink to its final destination
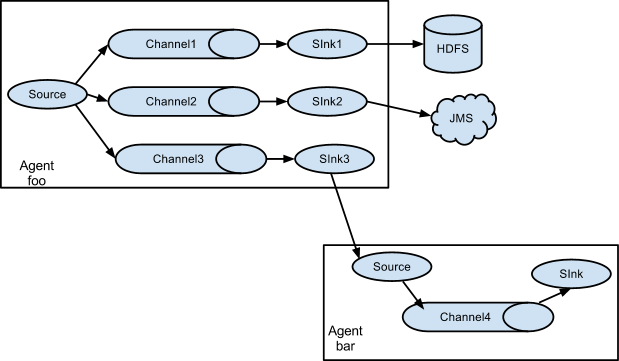
3. Multiplexing (as shown above) - Flume supports multiplexing the event flow to one or more destinations. This is achieved by defining a flow multiplexer that can replicate or selectively route an event to one or more channels.
Flume works on transactional approach to ensure reliability.
Now Let's do some example for better understanding of how flume works -
As we saw in agent diagram that for defining flume dataflow we need following things -1. Sink
2. Source
3. Channel
Now there are multiple varieties of sources, sinks and channel avialable.for Example 1 we are going to take
- Logger as Sink
- NetCat as Source
- Memory Channel as Channel
Example 1
For this example I used CentOS 6.8 with flume installed.
In order to use flume as a pipeline we need to define a configuration file which contain information about source, sink and channel we want to use.
Given below is configuration file for this example
# example.conf: A single-node Flume configuration
# 1 Name the components on this agent
a1.sources = r1
a1.sinks = k1
a1.channels = c1
# 2 Describe/configure the source
a1.sources.r1.type = netcat
a1.sources.r1.bind = localhost
a1.sources.r1.port = 44444
# 3 Describe the sink
a1.sinks.k1.type = logger
# 4 Use a channel which buffers events in memory
a1.channels.c1.type = memory
a1.channels.c1.capacity = 1000
a1.channels.c1.transactionCapacity = 100
# 5 Bind the source and sink to the channel
a1.sources.r1.channels = c1
a1.sinks.k1.channel = c1
Now lets understand what its each component do -
#1 Name the component
# Name the components on this agent
#a1 is name of our agent
a1.sources = r1 # r1 is name of our source
a1.sinks = k1 # k1 is name of our sink
a1.channels = c1 #c1 is name of our channel
#2 Source Configuration
# 2 Describe/configure the source
a1.sources.r1.type = netcat
a1.sources.r1.bind = localhost # Host name or IP address to bind to
# since we are generating data from same system we are using localhost as bind
a1.sources.r1.port = 44444 # Port to bind to
There are multiple type of Source available to work with flume some of those are - AVRO, Thrift, Exec, Kafka etc. Here we are using netcat as our source.
Netcat (often abbreviated to nc) - is a computer networking utility for reading from and writing to network connections using TCP or UDP. Netcat is designed to be a dependable back-end that can be used directly or easily driven by other programs and scripts.
# 3 Describe the sink
a1.sinks.k1.type = logger
# 4 channel Configuration
a1.channels.c1.type = memory
a1.channels.c1.capacity = 1000
a1.channels.c1.transactionCapacity = 100
This channel have various property attached to it but the given 3 properties are compulsory to be defined.
# 5 Bind the source and sink to the channel
a1.sources.r1.channels = c1
a1.sinks.k1.channel = c1
Now we need to save example.conf in conf folder of flume. If you are using centos provided by cloudera then flume will be installed in following directory /usr/lib/flume So open this directory there will be folder name conf inside it now save the example.conf inside it.
After saving example.conf. Enter this command in terminal.
$ ./flume-ng agent --conf conf --conf-file example.conf --name a1 -Dflume.root.logger=INFO,consoleNow we need to create a source at port number 44444 as defined in our configuration file. We will use netcat for it. In order to create a source we will use telnet. Enter the following command in terminal
$ telnet localhost 44444Congrats you have created your first flume application.
Example 2
Getting Twitter Data with FlumeJust like in last example here also we need a configuration file in order to connect with twitter source
Given below is our configuration file
# Naming the components on the current agent.
TwitterAgent.sources = Twitter
TwitterAgent.channels = MemChannel
TwitterAgent.sinks = HDFS

# Describing/Configuring the source
TwitterAgent.sources.Twitter.type = org.apache.flume.source.twitter.TwitterSource
TwitterAgent.sources.Twitter.consumerKey = Your OAuth consumer key
TwitterAgent.sources.Twitter.consumerSecret = Your OAuth consumer secret
TwitterAgent.sources.Twitter.accessToken = Your OAuth consumer key access token
TwitterAgent.sources.Twitter.accessTokenSecret = Your OAuth consumer key access token secret
TwitterAgent.sources.Twitter.keywords = tutorials point,java, bigdata, mapreduce, mahout, hbase, nosql

# Describing/Configuring the sink
TwitterAgent.sinks.HDFS.type = hdfs
TwitterAgent.sinks.HDFS.hdfs.path = hdfs://localhost:9000/user/Hadoop/twitter_data/
TwitterAgent.sinks.HDFS.hdfs.fileType = DataStream
TwitterAgent.sinks.HDFS.hdfs.writeFormat = Text
TwitterAgent.sinks.HDFS.hdfs.batchSize = 1000
TwitterAgent.sinks.HDFS.hdfs.rollSize = 0
TwitterAgent.sinks.HDFS.hdfs.rollCount = 10000

# Describing/Configuring the channel TwitterAgent.channels.MemChannel.type = memory
TwitterAgent.channels.MemChannel.capacity = 10000
TwitterAgent.channels.MemChannel.transactionCapacity = 100

# Binding the source and sink to the channel
TwitterAgent.sources.Twitter.channels = MemChannel
TwitterAgent.sinks.HDFS.channel = MemChannel
#Naming the components on the current agent.
TwitterAgent.sources = Twitter
TwitterAgent.channels = MemChannel
TwitterAgent.sinks = HDFS
# Describing/Configuring the source
#Describing the source
TwitterAgent.sources.Twitter.type = org.apache.flume.source.twitter.TwitterSource
TwitterAgent.sources.Twitter.consumerKey = Your OAuth consumer key
TwitterAgent.sources.Twitter.consumerSecret = Your OAuth consumer secret
TwitterAgent.sources.Twitter.accessToken = Your OAuth consumer key access token
TwitterAgent.sources.Twitter.accessTokenSecret = Your OAuth consumer key access token secret
TwitterAgent.sources.Twitter.keywords = tutorials point,java, bigdata, mapreduce, mahout, hbase, nosql # these are the keyword which we want our tweets
1. Consumer key
2. ConsumerSecret
3. Access Token
4. Access Token Secret
After this we need to provided all these properties inside configuration file as mentioned above in "Describing the source".
#Registering with Twitter # Describing/Configuring the sink
#Describing the sink
TwitterAgent.sinks.HDFS.type = hdfs
TwitterAgent.sinks.HDFS.hdfs.path = hdfs://localhost:8020/user/Hadoop/twitter_data/
TwitterAgent.sinks.HDFS.hdfs.fileType = DataStream
TwitterAgent.sinks.HDFS.hdfs.writeFormat = Text
TwitterAgent.sinks.HDFS.hdfs.batchSize = 1000
TwitterAgent.sinks.HDFS.hdfs.rollSize = 0
TwitterAgent.sinks.HDFS.hdfs.rollCount = 10000
# Describing/Configuring the channel
TwitterAgent.channels.MemChannel.type = memory
TwitterAgent.channels.MemChannel.capacity = 10000
TwitterAgent.channels.MemChannel.transactionCapacity = 100
# Binding the source and sink to the channel
TwitterAgent.sources.Twitter.channels = MemChannel
TwitterAgent.sinks.HDFS.channel = MemChannel
Now we need to save twitter.conf in conf folder of flume. If you are using centos provided by cloudera then flume will be installed in following directory /usr/lib/flume So open this directory there will be folder name conf inside it now save the twitter.conf inside it.
After saving twitter.conf. Enter this command in terminal.
./flume-ng agent --conf conf --conf-file twitter.conf --name TwitterAgent -Dflume.root.logger=INFO,console